You have found your dream invitations, placed an order and received your delivery. You open one box in great anticipation to see the finished product. After taking in the beauty of your invitation, you notice that there are so many other boxes. So many inserts...how do I start to assemble without leaving anything out.
You should put together one full invitation and take to the post office for weighing so that you could know exactly how much postage you will need. The post office has wedding related stamps that you can use or you can order custom stamps from an online site like Zazzle.com.
To begin create piles of of each piece of the wedding ensemble. In the order that they will be placed. This will help make your list manageable and ensure that you do not forget anyone on your list. Have your completed list
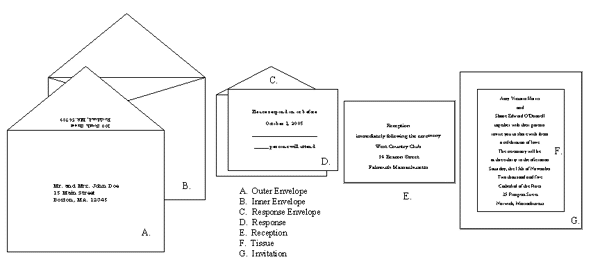
Most printed wedding invitations arrive flat and need to be folded before you can begin assembling wedding invitation inserts. Tissue paper is usually provided and it is used between inserts. Place the tissue over the imprinted areas. Depending on the style of your invitation your inserts will either be tucked in or placed on top. You will receive two envelopes for each invitation: an outer and an inner envelope. If selected the inner envelope will be the one with the lining. The inner envelope should not be sealed, it will usually not have adhesive anyway. Here is the suggested order to follow when assembling wedding invitation pieces:
1. Reception Card (if included) right on top of the tissue paper with its wording facing you. It should be closest to the invitation.
2. Response Card is tucked underneath the flap of the response envelope with the printing facing you making it one enclosure. Place on top of Reception Card (or tissue paper if Reception Card is not included). Don't forget to put a stamp on the response envelope or response postcard.
•Enclosures such as maps are usually placed beneath the response card or card closest to the invitation. The card is placed on top of the invite, or they can be tucked inside the invitation if it's a folded card.
When you have your invitation and all inserts ready, you should place in inner envelope with front of invitation facing the flap. When your guests open their envelopes the will be greeted by your beautiful invitations.
Inner envelope once filled will be placed in outer envelope with flap of inner envelop facing the inside of the outer envelope.
Here is a video that will give you more visual instructions.


useful! who knew there was a process?
ReplyDeleteNice tips. I've been reading your posts recently and I think your blog is awesome. I have shared it with my colleagues for them to check it out. Keep up the great work.
ReplyDelete